Three Objects: Burnt Umber & White Part III

Watch as Jeff takes this challenging setup to its finish. Sit back and relax!

Watch as Jeff takes this challenging setup to its finish. Sit back and relax!

During this lesson we continue to work the form. Like in drawing, each change in value describes a change in form to the eyes of your viewers. Always try to tell them the clearest story you can.

Join Jeff as he shows you how to bring up a more complex setup. Notice how the objects vary in size and complexity. Remember, this isn't just about moving paint. We are cultivating our eyes' ability to recognize nice pictorial arrangements as well.

Join Jeff as he finishes off this two-object painting. As always, pay attention to how he handles the various tools.

This lesson is a bit more complicated than before, but it is simple enough as to ease you into more complex setups. We will get to those setups soon enough, and in the next phase we will worry about patinas. For now be aware of the inherent quality each object possesses.

In this lesson the emphasis is placed on brushmanship. The addition of white means we are now moving into the "sweet spot" of oil consistency. Here Jeff demonstrates pushing around paint to create attractive strokes, as well as how to layer up the paint correctly. This is still primarily a edge and value exercise.

Pick out is a simple and effective technique, even for complex subjects. In this continuation Jeff applies the technique to a glass surface.

Two objects now enter the composition and must be staged together. In this exercise Jeff shows how to use pick out to build up to a nice finish.

Jeff will now bring this pick-out to a finish. Pay attention to the use of tools for the various stages.

In this video lesson Jeff will demonstrate a burnt umber pick-out of one object. Keep working on mastering this monochrome technique because it will be used in future phases and techniques.

A continuation of part I, this lesson is about cutting and carving your shapes, as well as cultivating keen skills in value and edge manipulation.

In this lesson we will tackle painting the female cast in a front pose. You will do this technique from a photo, using burnt umber and white. Although this is not exactly like working from a real cast it will still serve as a good starting off point.

Follow Jeff as he creates the Zorn palette with just 4 colors. You will use the Zorn palette all of the lessons in Phase II Portrait and Phase II Figure.

In this lesson you will explore how to approach freehand drawing of the cone. Although not used extensively in the figure or head, the cone will come into play in many non-organic forms.
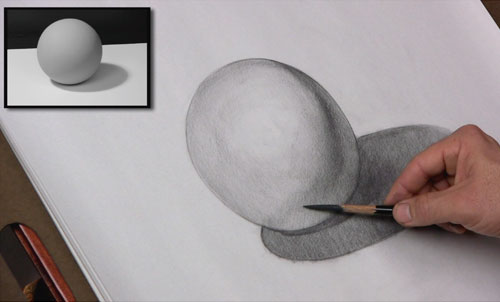
You will explore another very important shape in this exercise: the sphere. You will use both the sphere and its foreshortened relative the ellipse extensively in figure and portraiture.

The cube can be used to breakdown all sorts of complex forms, both organic and non-organic. The importance of drawing this form well will become very obvious when you explore the block-form mannequin in Phase I Figure.

In this lesson Jeff will walk you through the essential materials needed to begin the Watts drawing method.

This lesson will walk you through the proper mindset necessary to succeed in the fundamentals, as well as prepare you for the phases to come.


Now we are ready to work this final painting up to a finish. Join Jeff as he tightens this one up and hashes out those tricky knees.

This lesson is our last in this phase and, being a recliner, is possibly the most challenging. Join Jeff as he goes through how to tackle laying in this tough little problem. Reclining poses are a great way to get used to the natural distortion of a figure in perspective; what we refer to as foreshortening.